Day and Night RaspberryPI Time Lapse camera with GUI support
Some time ago i’ve posted my Raspberry PI Time Lapse project, the project was actually a success, and very useful for me, so i decided to take the project one step further and add a GUI interface to control the camera.
For that matter i used “tkinter” (https://en.wikipedia.org/wiki/Tkinter), as a GUI framework.
This is a new release of my Day and Night Time Lapse tool,
current version: 2.3.3
on this version i have added:
- Configuration file
- GUI interface
- Individual mode initiator
The configuration file makes it more comfortable to work with the tool and GUI interface simplifies it even more.
For GUI I used tkinter that displays imported configuration values from the configuration file and allows to update the file with new values, additionally it allows you to start and stop the camera.
The core concept has not changed (you can read about it here: https://eli-bukin.com/home/projects/day-and-night-timelapse-with-raspberrypi/), it still runs a python script with the same loops and functionalities, only this time the parameters and variables stored in a configuration file.
and now you can manage all that from a convenient dashboard.
Some camera parameters are still hardcoded (iso, shutterspeed, etc…) but I guess I’ll add them to the console in next releases of the tool.
This tool was developed and tested on 2020-08-20-raspios-buster-armhf-full.img that was downloaded from the official site and installed on a USB stick.
Prerequisites to use the tool:
you have to install Tkinter, you can use the following command:
- pip3 install tkinter
- pip3 install pyyaml
Usage:
Navigate to “day-and-night-timelapse-v2.3” directory and run:
“python3 camera_gui_interface.py &”
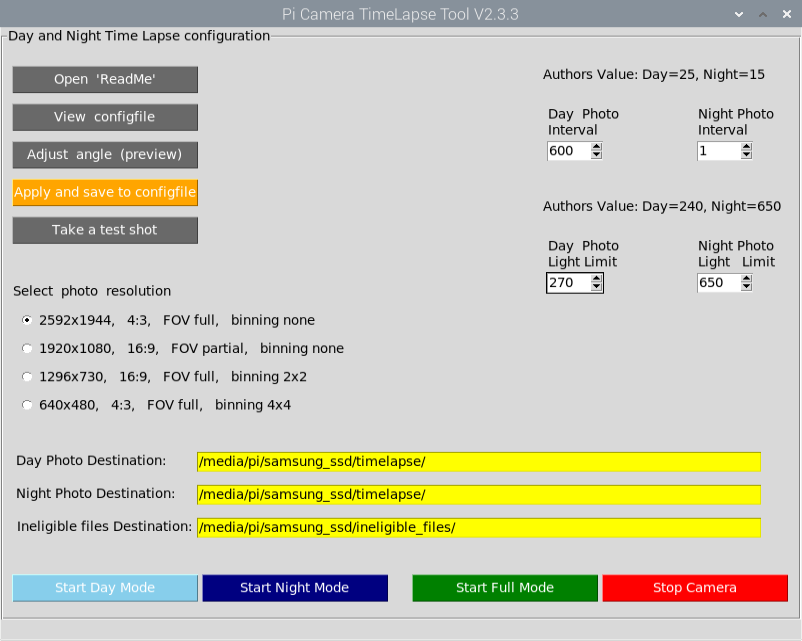
Open ReadMe:
will open the readme file.
View configfile:
will open a config file in a new mousepad instance.
Adjust angle:
starts a preview for 120 seconds, that will allow you to fix the camera.
(NOTE if you are not using a monitor connected to the PI but connected via VNC then go to VNC options > troubleshooting > and enable “direct capture mode”, then you’ll be able to view the camera preview image over the vnc connection.)
(NOTE2 that the preview will open with the resolution that is updated in the config file, therefore if you change the resolution and want to play a preview, you must save and apply the config.
Apply and save to configfile:
will save the changed configuration to configfile.
Take a test shot:
Takes a test photo ans saves it to ineligible destination.
Start day mode:
Camera starts in day mode and will not switch to night mode when light reached defined threshold, the camera will stop automatically.
Start night mode:
Camera starts in night mode and will not switch to day mode when light reached defined threshold, the camera will stop automatically.
Start Camera:
Camera starts and adopts to defined threshold, will switch betwin modes automatically.
Stop Camera:
is pretty obvious.
And now the backend,
this is the “camera_gui_interface.py” file, it should be run from terminal and i suggest to run it with an “&”, so the process will start detached from terminal, for debugging it is obviously better to run it without the “&”.
for example: $ python3 camera_gui_interface.py &
This file creates the graphical user interface and imports parameters from configuration file.
After changing values you should hit the “Apply and save to configfile”, that should be done before you hit the “Start Camera” button.
#!/usr/bin/python3
from tkinter import *
from tkinter import messagebox
import subprocess
import os
import yaml

fname = "cam_configfile.yaml"

### variables from configfile
with open(fname, "r") as ymlfile:
   configfile = yaml.safe_load(ymlfile)

current_day_value_in_configfile = configfile['day_config']['dinterval']
current_night_value_in_configfile = configfile['night_config']['ninterval']
current_resolution = configfile['camera_parameters']['resolution']
current_day_light_limit = configfile['day_config']['dlight_low_limit']
current_night_light_limit = configfile['night_config']['nlight_low_limit']
current_day_destination_path = configfile['path_vars']['ddest_photo_day']
current_night_destination_path = configfile['path_vars']['ndest_photo_night']
current_ineligible_files_path = configfile['path_vars']['ineligible_files']

###
top = Tk()
top.geometry("800x650")
top.resizable(width=False, height=False)
top.title("Pi Camera TimeLapse Tool V2.3.3")

### frame
labelframe = LabelFrame(top, text = "Day and Night Time Lapse configuration", width=250, height=80)
labelframe.pack(fill = "both", expand = "yes")

                        ######  Caption Section   ######

### caption (authors values interval)
var = StringVar()
label = Label( top, textvariable=var, relief=FLAT )

var.set("Authors Value: Day=25, Night=15")
#label.pack()
label.place(x = 540,y = 40)

### caption (authors values light limit)
var = StringVar()
label = Label( top, textvariable=var, relief=FLAT )

var.set("Authors Value: Day=240, Night=650")
label.pack()
label.place(x = 540,y = 180)

### caption (radio buttons)
var = StringVar()
label = Label( top, textvariable=var, relief=FLAT )

var.set("Select  photo  resolution")
label.pack()
label.place(x = 10,y = 270)

### caption (day interval)
var_day = StringVar()
label = Message( top, textvariable = var_day, relief = FLAT, width = 100 )

var_day.set("Day  Photo Interval")
label.pack()
label.place(x = 540,y = 80)

### caption (night interval)
var_night = StringVar()
label = Message( top, textvariable = var_night, relief = FLAT, width = 100 )

var_night.set("Night Photo Interval")
label.pack()
label.place(x = 690,y = 80)

### caption (day light limit)
var_day = StringVar()
label = Message( top, textvariable = var_day, relief = FLAT, width = 100 )

var_day.set("Day  Photo Light Limit")
label.pack()
label.place(x = 540,y = 220)

### caption (night light limit)
var_night = StringVar()
label = Message( top, textvariable = var_night, relief = FLAT, width = 100 )

var_night.set("Night Photo  Light   Limit")
label.pack()
label.place(x = 690,y = 220)

                        ######  Button Section  ######

### button 1
def open_readme():
    subprocess.call(['lxterminal', '-e', 'mousepad ../readme.txt'])

B1 = Button(top, text = "Open  'ReadMe'", command = open_readme, bg='dimgrey', fg='white', width=20)
B1.place(x = 10,y = 40)

### button 2
def view_configfile():
    subprocess.call(['lxterminal', '-e', 'mousepad cam_configfile.yaml'])

B2 = Button(top, text = "View  configfile", command = view_configfile, bg='dimgrey', fg='white', width=20)
B2.place(x = 10,y = 80)

### button 5
def preview():
    subprocess.call(['lxterminal', '-e', 'python3 cam_preview.py cam_configfile.yaml'])

B5 = Button(top, text = "Adjust  angle  (preview)", command = preview, bg='dimgrey', fg='white', width=20)
B5.place(x = 10,y = 120)

### button 3 (start camera)
def start_camera():
    subprocess.call(['lxterminal', '-e', 'python3 day-and-night-timelapse-full.py cam_configfile.yaml'])

B3 = Button(top, text = "Start Full Mode", command = start_camera, bg='green', fg='white', width=20)
B3.place(x = 410,y = 580)

### button 4 (stop camera)
def stop_camera():
    subprocess.call(['lxterminal', '-e', 'kill $(ps aux | grep "day-and-night-timelapse-full.py cam_configfile.yaml" && ps aux | grep "_mode.py" )'])
    subprocess.call(['lxterminal', '-e', 'kill $(ps aux | grep "_mode.py" )'])

B4 = Button(top, text = "Stop Camera", command = stop_camera, bg='red', fg='white', width=20)
B4.place(x = 600,y = 580)

### button 6 (start day mode)
def start_camera():
    subprocess.call(['lxterminal', '-e', 'python3 day_mode.py cam_configfile.yaml'])

B6 = Button(top, text = " Start Day Mode ", command = start_camera, bg='skyblue', fg='white', width=20)
B6.place(x = 10,y = 580)

### button 7 (start night mode)
def stop_camera():
    subprocess.call(['lxterminal', '-e', 'python3 night_mode.py cam_configfile.yaml'])

B7 = Button(top, text = "Start Night Mode", command = stop_camera, bg='navy', fg='white', width=20)
B7.place(x = 200,y = 580)

### Button 8  apply button (save to configfile)
def apply_button():
    select_interval_day()
    select_interval_night()
    sel_resolution()
    spbx1_day_light_limit()
    spbx2_night_light_limit()
    entrybox1()
    entrybox2()
    entrybox3()
    with open(fname, "r") as ymlfile:
        cfg = yaml.load(ymlfile, Loader=yaml.FullLoader)
        cfg['day_config']['dinterval'] = select_interval_day.selection
        cfg['night_config']['ninterval'] = select_interval_night.selection
        cfg['camera_parameters']['resolution'] = sel_resolution.selected
        cfg['day_config']['dlight_low_limit'] = spbx1_day_light_limit.selectionn
        cfg['night_config']['nlight_low_limit'] = spbx2_night_light_limit.selectionn
        cfg['path_vars']['ddest_photo_day'] = entrybox1.selection
        cfg['path_vars']['ndest_photo_night'] = entrybox2.selection
        cfg['path_vars']['ineligible_files'] = entrybox3.selection
    with open(fname, 'w') as outfile:
        yaml.dump(cfg, outfile, default_flow_style=False, sort_keys=False)

B4 = Button(top, text = "Apply and save to configfile", command = apply_button, bg='orange', fg='white', width=20)
B4.place(x = 10,y = 160)

### button 9 (Take a test shot)
def stop_camera():
    subprocess.call(['lxterminal', '-e', 'python3 test-shot.py cam_configfile.yaml'])

B9 = Button(top, text = "Take a test shot", command = stop_camera, bg='dimgrey', fg='white', width=20)
B9.place(x = 10,y = 200)

### radiobuttons (resolution)
def sel_resolution():
   selected_resolution = str(var.get())
   sel_resolution.selected = selected_resolution

root = top
var = StringVar()
var.set (current_resolution)

R1 = Radiobutton(root, text="2592x1944,   4:3,   FOV full,   binning none", variable=var, value='2592, 1944', command=sel_resolution)
R1.place(x = 10,y = 300)

R2 = Radiobutton(root, text="1920x1080,   16:9,   FOV partial,   binning none", variable=var, value='1920, 1080', command=sel_resolution)
R2.place(x = 10,y = 330)

R3 = Radiobutton(root, text="1296x730,   16:9,   FOV full,   binning 2x2 ", variable=var, value='1296, 730', command=sel_resolution)
R3.place(x = 10,y = 360)

R4 = Radiobutton(root, text="640x480,   4:3,   FOV full,   binning 4x4 ", variable=var, value='640, 480', command=sel_resolution)
R4.place(x = 10,y = 390)


                        ######  SpinBox Section  ######

### spinbox1 day light limit
def spbx1_day_light_limit():
   spbx1_selection_day = int(spbx1var.get())
   spbx1_day_light_limit.selectionn = spbx1_selection_day

spbx1var = IntVar()
spbx1var.set(current_day_light_limit)
spinbox_day = Spinbox( top, from_=1, to=1000, width=5, textvariable=spbx1var )
spinbox_day.place(x = 545,y = 260)

### spinbox2 night light limit
def spbx2_night_light_limit():
   spbx2_selection_night = int(spbx2var.get())
   spbx2_night_light_limit.selectionn = spbx2_selection_night

spbx2var = IntVar()
spbx2var.set(current_night_light_limit)
spinbox_night = Spinbox( top, from_=1, to=1000, width=5, textvariable=spbx2var )
spinbox_night.place(x = 695,y = 260)

### spinbox3 day interval
def select_interval_day():
   spbx3_selection_day = int(spbx3var.get())
   select_interval_day.selection = spbx3_selection_day

spbx3var = IntVar()
spbx3var.set(current_day_value_in_configfile)
spinbox_day_interval = Spinbox( top, from_=1, to=1000, width=5, textvariable=spbx3var )
spinbox_day_interval.place(x = 545,y = 120)

### spinbox4 night interval
def select_interval_night():
   spbx4_selection_night = int(spbx4var.get())
   select_interval_night.selection = spbx4_selection_night

spbx4var = IntVar()
spbx4var.set(current_night_value_in_configfile)
spinbox_night_interval = Spinbox( top, from_=1, to=1000, width=5, textvariable=spbx4var )
spinbox_night_interval.place(x = 695,y = 120)

                        ######  Entry Box Section  ######

### entry box1 (day photo destination)
def entrybox1():
    entrbx1 = str(e1_str.get())
    entrybox1.selection = entrbx1

my_w = top
l1 = Label(my_w,  text='Day Photo Destination:', width=20)  # added one Label
l1.place(x = 8, y = 450)

e1_str = StringVar()
e1_str.set(current_day_destination_path)
e1 = Entry(my_w,   width=70,bg='yellow', textvariable=e1_str) # added one Entry box
e1.place(x = 195, y = 450)


### entry box2 (night photo destination)
def entrybox2():
    entrbx2= str(e2_str.get())
    entrybox2.selection = entrbx2

my_w = top
l2 = Label(my_w,  text=' Night Photo Destination:', width=20 )  # added one Label
l2.place(x = 10, y = 485)

e2_str = StringVar()
e2 = Entry(my_w,   width=70,bg='yellow', textvariable=e2_str) # added one Entry box
e2.place(x = 195, y = 485)
e2_str.set(current_night_destination_path)

### entry box3 (ineligible files destination)
def entrybox3():
    entrbx3= str(e3_str.get())
    entrybox3.selection = entrbx3

my_w = top
l3 = Label(my_w,  text='Ineligible files Destination:', width=25 )  # added one Label
l3.place(x = 2, y = 520)

e3_str = StringVar()
e3 = Entry(my_w,   width=70,bg='yellow', textvariable=e3_str) # added one Entry box
e3.place(x = 195, y = 520)
e3_str.set(current_ineligible_files_path)


label = Label(root)
label.pack()

### end
top.mainloop()
and this is the “day-and-night-timelapse-full-v2.3.py” file.
It is the main functionality file that holds the loops that actually do the time lapse shooting.
it retrieves the needed parameters from the configuration file.
NOTE: if you are running your camera on a PI with no screen or VNC connection but via SSH connection you can run this file straight forward, but you will have to adjust the parameters in the config file manually.
#!/usr/bin/python3

import time
import picamera
from picamera import PiCamera
from fractions import Fraction
import sys
from check_light_func import check_light
from time import sleep
from datetime import datetime
import yaml
# to move the ineligible file
import os
import shutil

### defines arguments as variables
configfile_location = (sys.argv[1])
#
with open(configfile_location, "r") as ymlfile:
   configfile = yaml.safe_load(ymlfile)

dest_photo_day = configfile['path_vars']['ddest_photo_day']
dest_photo_night = configfile['path_vars']['ndest_photo_night']
dest_location = configfile['path_vars']['dest_location']
ineligible_files = configfile['path_vars']['ineligible_files']
day_interval = configfile['day_config']['dinterval']
night_interval = configfile['night_config']['ninterval']
day_light_low_limit = configfile['day_config']['dlight_low_limit']
night_light_low_limit = configfile['night_config']['nlight_low_limit']
cam_resolution = configfile['camera_parameters']['resolution']

string_from_configfile = cam_resolution

### converting the string from configfile to tuple that will be used in the timelapse loop
# using map() + tuple() + int + split()
res = tuple(map(int, string_from_configfile.split(', ')))

# printing result
#print("Tuple after getting conversion from String : " + str(res))
cam_resolution1 = res

###
def helloday():
   print ('[INFO]: Switching to Day Mode')

def hellonight():
   print ('[INFO]: Switching to Night Mode')

### Night Mode
def night_mode():
   camera = PiCamera(resolution=(cam_resolution1), framerate=Fraction(1, 6))
   camera.shutter_speed = 6000000
   camera.iso = 800
   # Give the camera a good long time to set gains and
   # measure AWB (you may wish to use fixed AWB instead)
   sleep(5)
   camera.exposure_mode = 'off'
   # Finally, capture an image with a 6s exposure. Due
   # to mode switching on the still port, this will take
   # longer than 6 seconds
   ###
   try:
     for filename in camera.capture_continuous(dest_photo_night+'night '+'{timestamp:%a-%d.%m.%Y-%H-%M-%S}'+'_{counter:05d}.jpg'):
        print('[INFO]: NM Captured %s' % filename)
        time.sleep(night_interval) # interval in seconds
        check_light(dest_photo_night+'*')
        print ('[INFO]: light is ' + str(check_light.light))
        if check_light.light < night_light_low_limit:
           print ('[INFO]: '+(check_light.img +' is a night photo'))
        else:
           print ('[INFO]: '+(check_light.img +' is a day photo'))
           # this strips the filepath from filename
           ineligible = os.path.basename(check_light.img)
           shutil.move(check_light.img, ineligible_files+ineligible)
           helloday()
           camera.close()
           day_mode()
           break
   except Exception as e:
         print("Something went wrong... check Night logfile " , e)
         import datetime
         filename = datetime.datetime.now()
         with open(filename.strftime("LogFile_Night_"+"%Y %B %d %H-%M-%S")+".txt", "w") as file:
             file.write("Error: "+str(e))

   finally:
         camera.close()


### Day Mode
def day_mode():
      camera = PiCamera(resolution=(cam_resolution1))
      time.sleep(2)
      try:
        for filename in camera.capture_continuous(dest_photo_day+'day '+'{timestamp:%a-%d.%m.%Y-%H-%M-%S}'+'_{counter:05d}.jpg'):
           print ('[INFO]: DM Captured %s' % filename)
           time.sleep(day_interval) # interval in seconds
           check_light(dest_photo_day+'*')
           print ('[INFO]: light is ' + str(check_light.light))
           if check_light.light < day_light_low_limit:
              print ('[INFO]: '+(check_light.img +' is a night photo'))
              # this strips the filepath from filename
              ineligible = os.path.basename(check_light.img)
              shutil.move(check_light.img, ineligible_files+ineligible)
              hellonight()
              camera.close()
              night_mode()
              break
           else:
              print ('[INFO]: '+(check_light.img +' is a day photo'))
      except Exception as e:
         print("Something went wrong... check Day logfile " , e)
         import datetime
         filename = datetime.datetime.now()
         with open(filename.strftime("LogFile_Day_"+"%Y %B %d %H-%M-%S")+".txt", "w") as file:
             file.write("Error: "+str(e))

      finally:
         camera.close()


day_mode()
Next it is the function that evaluates the light conditions, it is not changed from the previous version.
#!/usr/bin/python3

import glob
import os
import time
from PIL import Image, ImageStat
import math
#
import sys

def check_light(image):
   # gets the latest file from the list of files
   list_of_files = glob.glob(image) # * means all, if need specific format then *.csv
   latest_file = max(list_of_files, key=os.path.getctime)

   imgFile = latest_file

   # brigtness functions inspired by:
   # http://www.trevorappleton.blogspot.co.uk/2013/11/creating-time-lapse-camera-with.html

   #Covert image to greyscale, return average pixel brightness
   def brightness_GreyScaleMean():
      im = Image.open(imgFile).convert('L')
      stat = ImageStat.Stat(im)
      return stat.mean[0]

   #Covert image to greyscale, return RMS pixel brightness.
   def brightness_GreyScaleRMS():
      im = Image.open(imgFile).convert('L')
      stat = ImageStat.Stat(im)
      return stat.rms[0]

   #Average pixels, then transform to "perceived brightness".
   def brightness_Perceived():
      im = Image.open(imgFile)
      stat = ImageStat.Stat(im)
      r,g,b = stat.mean
      return math.sqrt(0.241*(r**2) + 0.691*(g**2) + 0.068*(b**2))

   summ_of_all_three = brightness_GreyScaleMean()+brightness_GreyScaleRMS()+brightness_Perceived()
   summ_of_all_three_int = int(summ_of_all_three)
   check_light.light = summ_of_all_three_int
   check_light.img = imgFile
This is “cam_preview.py”, an angle adjustment script, in this version it addresses the config file to retrieve the resolution.
#!/usr/bin/python3

import time
import picamera
import yaml
import sys

### defines arguments as variables
configfile_location = (sys.argv[1])
#
with open(configfile_location, "r") as ymlfile:
   configfile = yaml.safe_load(ymlfile)

cam_resolution = configfile['camera_parameters']['resolution']
string_from_configfile = cam_resolution

### converting the string from configfile to tuple that will be used in the timelapse loop
# using map() + tuple() + int + split()
res = tuple(map(int, string_from_configfile.split(', ')))

cam_resolution1 = res

###
with picamera.PiCamera() as camera:
    camera.resolution = (cam_resolution1)
    camera.start_preview()
    time.sleep(120)
    camera.stop_preview()
Lastly we get to “cam_configfile.yaml”, which is our configuration file, it is a YAML file, and if you choose to mess with it manually note that YAML is a very petty file to work with… :>>
path_vars:
  ddest_photo_day: /home/pi/Desktop/sysconfig_24/day-and-night-timelapse-v2.3/timelapse/
  ndest_photo_night: /home/pi/Desktop/sysconfig_24/day-and-night-timelapse-v2.3/timelapse/
  dest_location: /home/pi/Desktop/sysconfig_24/day-and-night-timelapse-v2.3/timelapse/*
  ineligible_files: ./ineligible_files/
day_config:
  dinterval: 5
  dlight_low_limit: 240
night_config:
  ninterval: 5
  nlight_low_limit: 650
camera_parameters:
  resolution: 1296, 730
And of course for the stitching we will use this wonderful script that does a splendid job
Create another file “stitch_photos_to_video.py” with the following code:
#!/usr/local/bin/python3

import cv2
import argparse
import os
import functools
from functools import cmp_to_key

def help ():
	with open(__file__, "r", encoding="UTF-8") as open_file:
		for line in open_file:
			if ":" in line and "def" in line and "if " not in line:
				print(line.split(" ")[1])

#Function to check if string can be cast to int
def isnum (num):
	try:
		int(num)
		return True
	except:
		return False

#Numerically sorts filenames
def image_sort_name (x,y):

	x = int(x.split(".")[0])
	y = int(y.split(".")[0])
	return x-y

#Sort filenames by their last edited datetime stamp
#This way, even if you didn't name and number your frames, you can still use their order of creation for sorting
#10/10! :)
def image_sort_datetime (x,y):
	x = os.path.getmtime(x)
	y = os.path.getmtime(y)
	return x - y

def render ():
	# Construct the argument parser and parse the arguments
	arg_parser = argparse.ArgumentParser()
	arg_parser.add_argument("-e", "--extension", required=False, default='png', help="Extension name. default is 'png'.")
	arg_parser.add_argument("-o", "--output", required=False, default='output.mp4', help="Output video file.")
	arg_parser.add_argument("-d", "--directory", required=False, default='.', help="Specify image directory.")
	arg_parser.add_argument("-fps", "--framerate", required=False, default='10', help="Set the video framerate.")
	arg_parser.add_argument("-s", "--sort", required=False, default='numeric', help="Determines the type of file-order sort that will be used. Current values: none, numeric, datetime")
	arg_parser.add_argument("-t", "--time", required=False, default='none', help="Sets the framerate so that the video length matches the time in seconds.")
	arg_parser.add_argument("-v", "--visual", required=False, default='false', help="If 'true' then will display preview window.")
	arg_parser.add_argument("-safe", "--safe", required=False, default='true', help="If 'false' then will try to render all images, not just consistenly-sized ones.")
	args = vars(arg_parser.parse_args())

	# Arguments
	dir_path = args['directory']
	ext = args['extension']
	output = args['output']
	framerate = args['framerate']
	sort_type = args['sort']
	time = args['time']
	visual = args['visual']

	#Flips bools to a bool-type
	visual = visual == "true"
	safe = args['safe'] == "true"

	#Sets the framerate to argument, or defaults to 10
	if not isnum(framerate):
		framerate = 10
	else:
		framerate = int(framerate)

	#Get the files from directory
	images = []
	for f in os.listdir(dir_path):
		if f.endswith(ext):
			images.append(f)

	#Sort the files found in the directory
	if sort_type == "numeric":
		int_name = images[0].split(".")[0]
		if isnum(int_name):
			images = sorted(images, key=cmp_to_key(image_sort_name))
		else:
			print("Failed to sort numerically, switching to alphabetic sort")
			images.sort()
	elif sort_type == "datetime":
		images = [dir_path + "/" + im for im in images]
		images = sorted(images, key=cmp_to_key(image_sort_datetime))
		images = ["".join(im.split(dir_path + "/")[1:]) for im in images]
	elif sort_type == "alphabetic":
		images.sort()

	#Change framerate to fit the time in seconds if a time has been specified.
	#Overrides the -fps arg
	if isnum(time):
		framerate = int(len(images) / int(time))
		print("Adjusting framerate to " + str(framerate))

	# Determine the width and height from the first image
	image_path = os.path.join(dir_path, images[0])
	frame = cv2.imread(image_path)

	if visual:
		cv2.imshow('video',frame)
	regular_size = os.path.getsize(image_path)
	height, width, channels = frame.shape

	# Define the codec and create VideoWriter object
	fourcc = cv2.VideoWriter_fourcc(*'mp4v') # Be sure to use lower case
	out = cv2.VideoWriter(output, fourcc, framerate, (width, height))

	for n, image in enumerate(images):
		image_path = os.path.join(dir_path, image)
		image_size = os.path.getsize(image_path)
		if image_size < regular_size / 1.5 and safe:
			print("Cancelled: " + image)
			print("Abnormal image size. Use the '-safe false' to disable this check")
			continue

		frame = cv2.imread(image_path)
		out.write(frame) # Write out frame to video
		if visual:
			cv2.imshow('video', frame)

		if (cv2.waitKey(1) & 0xFF) == ord('q'): # Hit `q` to exit
			break
		if n%100 == 0:
			print("Frame " + str(n))

	# Release everything if job is finished
	out.release()
	cv2.destroyAllWindows()

	print("The output video is {}".format(output))
render()
Usage: stitch_photos_to_video.py -e jpg -o /OUTPUT-FOLDER/FILE-NAME.EXT -d /INPUT-FOLDER -fps 20 -s datetime -v false -safe false
arguments:
“-e”, “–extension”, required=False, default=’png’, help=”Extension name. default is ‘png’.”
“-o”, “–output”, required=False, default=’output.mp4′, help=”Output video file.”
“-d”, “–directory”, required=False, default=’.’, help=”Specify image directory.”
“-fps”, “–framerate”, required=False, default=’10’, help=”Set the video framerate.”
“-s”, “–sort”, required=False, default=’numeric’, help=”Determines the type of file-order sort that will be used. Current values: none, numeric, datetime”
“-t”, “–time”, required=False, default=’none’, help=”Sets the framerate so that the video length matches the time in seconds.”
“-v”, “–visual”, required=False, default=’false’, help=”If ‘true’ then will display preview window.”
“-safe”, “–safe”, required=False, default=’true’, help=”If ‘false’ then will try to render all images, not just consistenly-sized ones.”
If you have any issues with the tool or you have some suggestions and enlightenment please don’t be shy and contact me.